The term webhook refers to an event notification that is sent to a URL of your choice. You can set them up to trigger events on one site to invoke behavior on another. The integration of webhooks with WooCommerce streamlines some of the real-time functionality of your online store. Are you interested in knowing more about WooCommerce webhooks? Don’t worry; we got you covered.
In today’s post, we will explain the WooCommerce webhooks guide. Let’s dive in.
What is WooCommerce Webhooks?
Webhooks allow apps to communicate with each other by sending them automated messages or instructions. It is a straightforward means of communicating among your online accounts and getting updates as needed.
The WooCommerce 2.2 version introduced webhooks, which set off events when you add, modify, or remove orders, products, discounts, or customers.
You can also use Webhooks with WooCommerce actions. For example, you can create a webhook for each product added to the cart using the action woocommerce_add_to_cart
Moreover, webhooks make third-party app integration easier for WooCommerce.

Advantages of Creating Webhooks in WooCommerce
Here are some benefits of creating webhooks in WooCommerce that you may want to consider.
- Webhooks can persuade the WooCommerce built-in plugin to function in the developer’s preferred manner.
- Webhooks allow WooCommerce to store and display information according to the developer’s preferences.
- You can use webhooks to gather customer data, track their activity, and take action quickly by implementing your custom code.
- Webhooks facilitate the integration of applications with external APIs and third-party services.
How to Create Webhooks in WooCommerce
The following is a step-by-step guide to creating webhooks in WooCommerce.
Step 1: Navigate to the Webhooks Tab in the WP Admin Area
Firstly, you must log in as an administrator of your WooCommerce store. Then, navigate to WooCommerce > Settings and select the Advanced option. After that, choose the Webhooks option from the submenu.
Note that WooCommerce versions before 3.4 may access Webhooks under WooCommerce > Settings > Webhooks
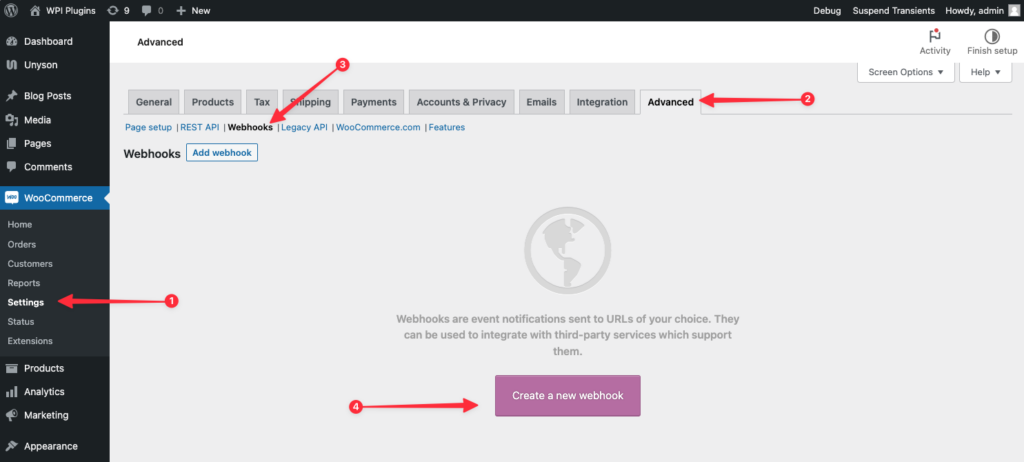
Step 2: Click on the Create Webhook or Add Webhook Button
When you click on Webhooks in the submenu, you’ll see an empty list of webhooks. That means Webhooks are not yet included in your WooCommerce store.
Click the Create a new webhook or Add webhook option to start.
After this, the Webhook Data box displays several configuration fields, which we’ll discuss next.
Step 3: Provide All the Details
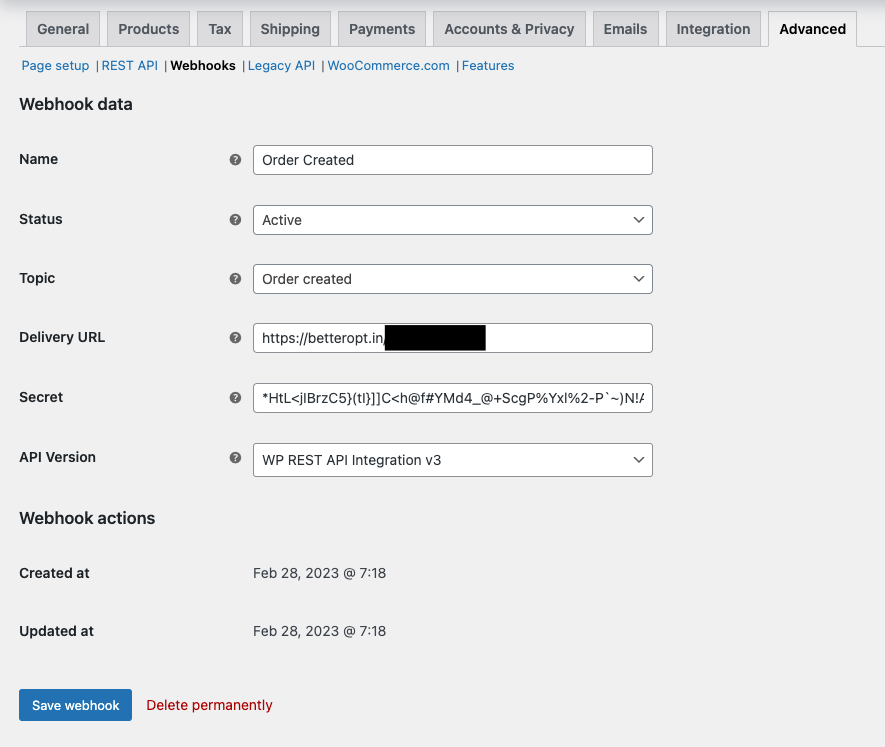
You must input or fill out the required information for each setting field.
Name: This field is accessible only to shop administrators. You can set the name as per your needs for the Webhook. You can also set it based on the date and time the Webhook was created.
Status: There are three types of status: Active (delivery), Paused (not delivery), and Disabled (delivery failure).
Topic: This will cause the Webhook to start activating. WooCommerce replenishes 15 actions and two custom actions. Action and custom are the two custom actions.
Below are the pre-defined actions.
- Coupon created
- Coupon updated
- Coupon deleted
- Coupon restored
- Customer created
- Customer updated
- Customer deleted
- Order created
- Order updated
- Order deleted
- Order restored
- Product created
- Product updated
- Product deleted
- Product restored
Action and custom are two more custom options.
When the topic is a WooCommerce action, the Action Event option is accessible. If the topic is set to Customer, a new setting field labeled “Custom Topic” will appear.
Delivery URL: The delivery URL is where the WooCommerce webhook payload will be sent.
Secret: The secret field generates a hash of the Webhook body. Afterward, the request headers contain that hash. Using this hash, the receiving end can authorize the webhooks.
API Version: There are three API versions to choose from. You can select one of the three versions. If you don’t have any special circumstances, leave it as “WP REST API Integration v3”.
Step 4: Save the Webhook
Save the webhook you have just created. Once the webhook is saved with an active status, a ping is sent to the Delivery URL.
How to Edit and Delete WooCommerce Webhooks?
WooCommerce webhooks are listed as posts and products, so editing and deleting them is easy. Here are the steps you need to take to edit and delete the WooCommerce webhooks.
Step 1: Find the Webhook
To get started, you must find the webhook you wish to edit or delete.
Step 2: Click Edit or Delete

When you hover your cursor over the webhook’s name, you will see two options: Edit and Delete Permanently.
All you need to do is select one of the two options.
Step 3: Edit, Delete, and Save Your Changes
After choosing “Delete Permanently,” complete the deletion of the webhook. If you wish to edit the Wocommerce webhooks, you must edit the webhook immediately.
After that, save the modifications you’ve just made.
The “Bulk Actions” dropdown list function also allows bulk deletion of webhooks.
How To Test WooCommerce Webhooks?
The following is a step-by-step guide for testing WooCommerce webhooks. We will test WooCommerce webhooks using RequestBin, and the topic “Order Updated” will be used in the webhook.
Step 1: Create a New Bin in RequestBin for Testing
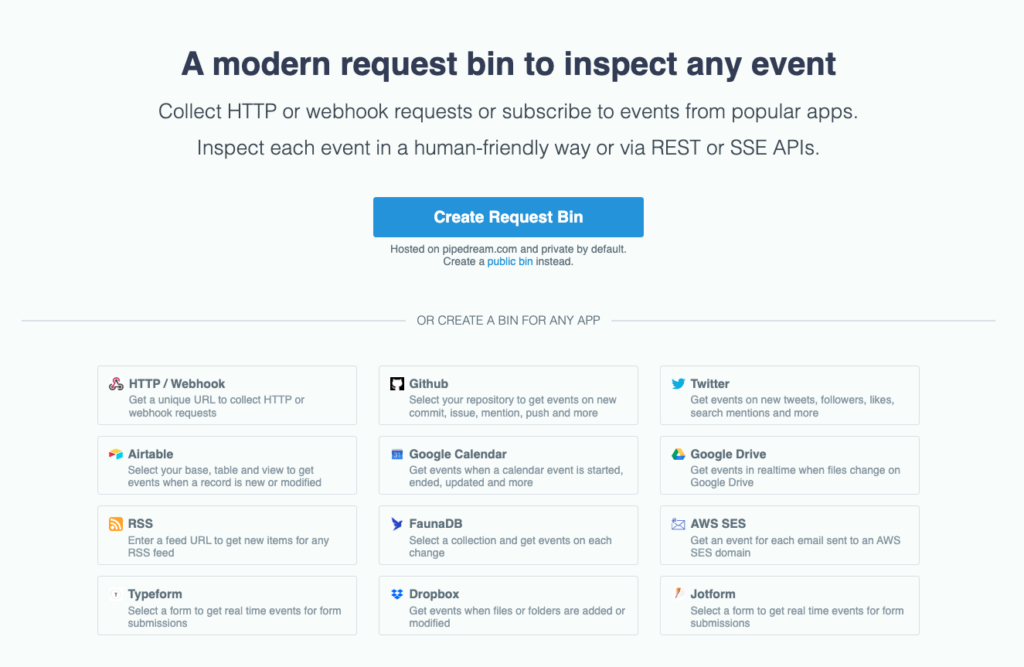
The first step is to visit RequestBin and create a new request bin for testing. You will need this bin URL for the next step, so keep this tab open in your browser.
Step 2: Paste the bin URL into the Delivery URL Box
Now, go back to the WooCommerce dashboard. You should build a webhook right now if you haven’t already.
Next, return to RequestBin and copy the bin URL that we mentioned previously. After that, paste that link into the Delivery URL box.
Step 3: Fill out the Remaining Fields Details
Fill out the additional fields for the webhook. Before saving, ensure the topic is “Order Created” and your webhook is set to “Active.”
Step 4: Trigger The Webhook
Trigger your webhook by following the instructions. As we’re testing Order Created, we need to:
- Navigate to WooCommerce > Orders
- Click the Add Order button
- Now click the “Create” button.
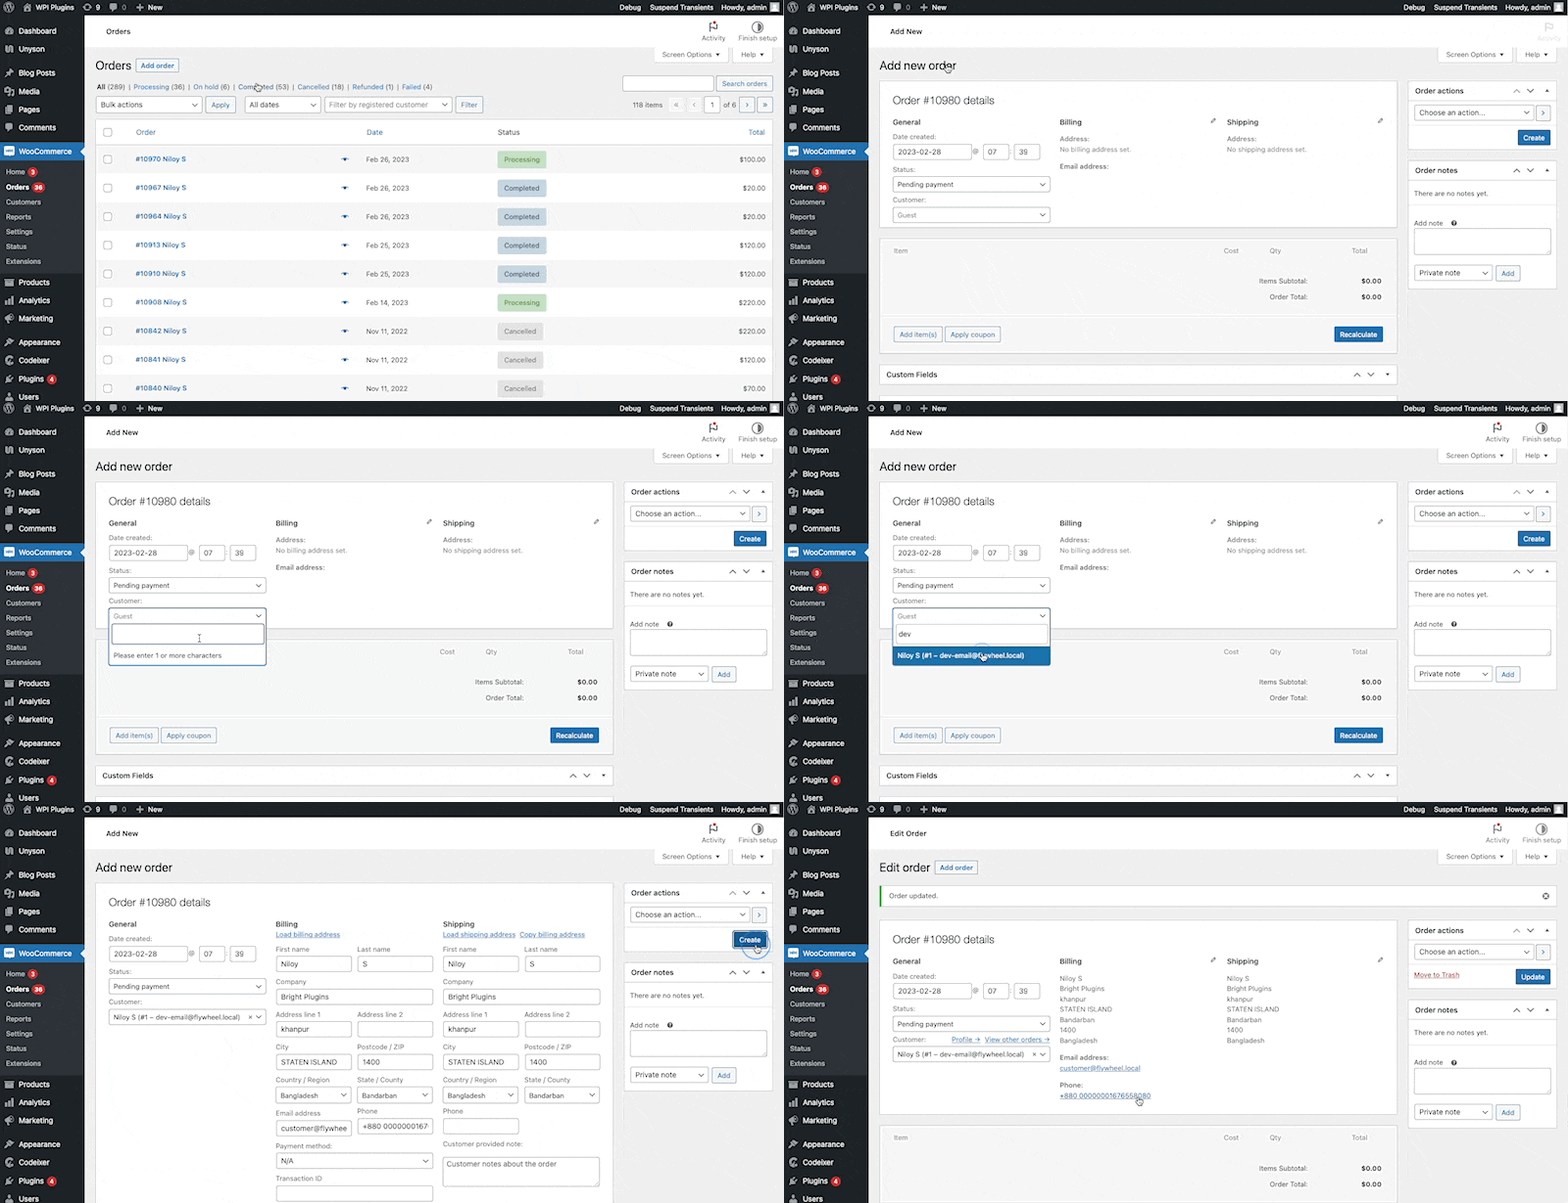
Currently, your webhooks are being delivered in the background, so please wait a moment.
Step 6: Go to the RequestBin Page
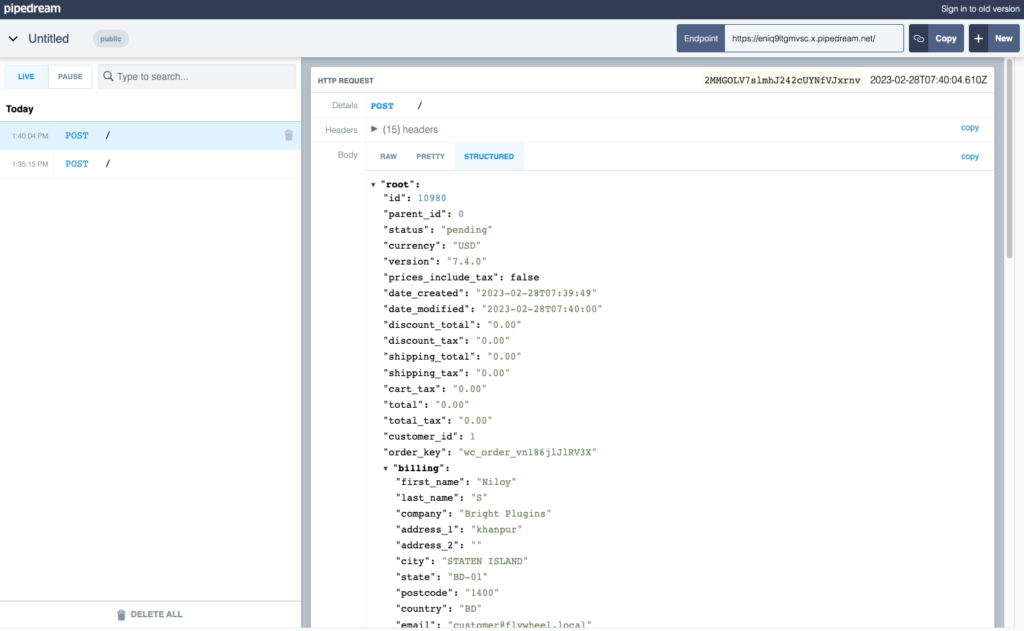
Open the RequestBin page for detailed information about the request included with the payload data.
The Best Tools for Testing WooCommerce Webhooks
Here’s an overview of several well-known testing and request collector tools for WooCommerce webhooks.
RequestBin
You can collect, analyze, and debug HTTP and webhook requests using RequestBin. It monitors webhooks’ delivery and payload data accuracy very closely.
RequestBin allows you to create a private bin for up to 20 requests, which you can keep for up to 48 hours. Once that period has passed, your requests will no longer be processed, making it a great time to test webhook delivery if you only need a fast solution.
Upon sending a webhook to a request collector URL, you can view the request content and headers.
Action Scheduler
Using the Action Scheduler, WooCommerce 3.5.0 sends and triggers webhooks asynchronously (in the background).
The Action Scheduler, now a part of WooCommerce, teaches you everything you need to know about queuing and dispatching webhook events. Access your data via Tools > Scheduled Actions.
WooCommerce Logs
WooCommerce logs display the headers and delivered data for a webhook request and the response contents. You can access webhook logs by going to WooCommerce > Status > Logs and selecting the webhook logs you wish to view from the dropdown menu.
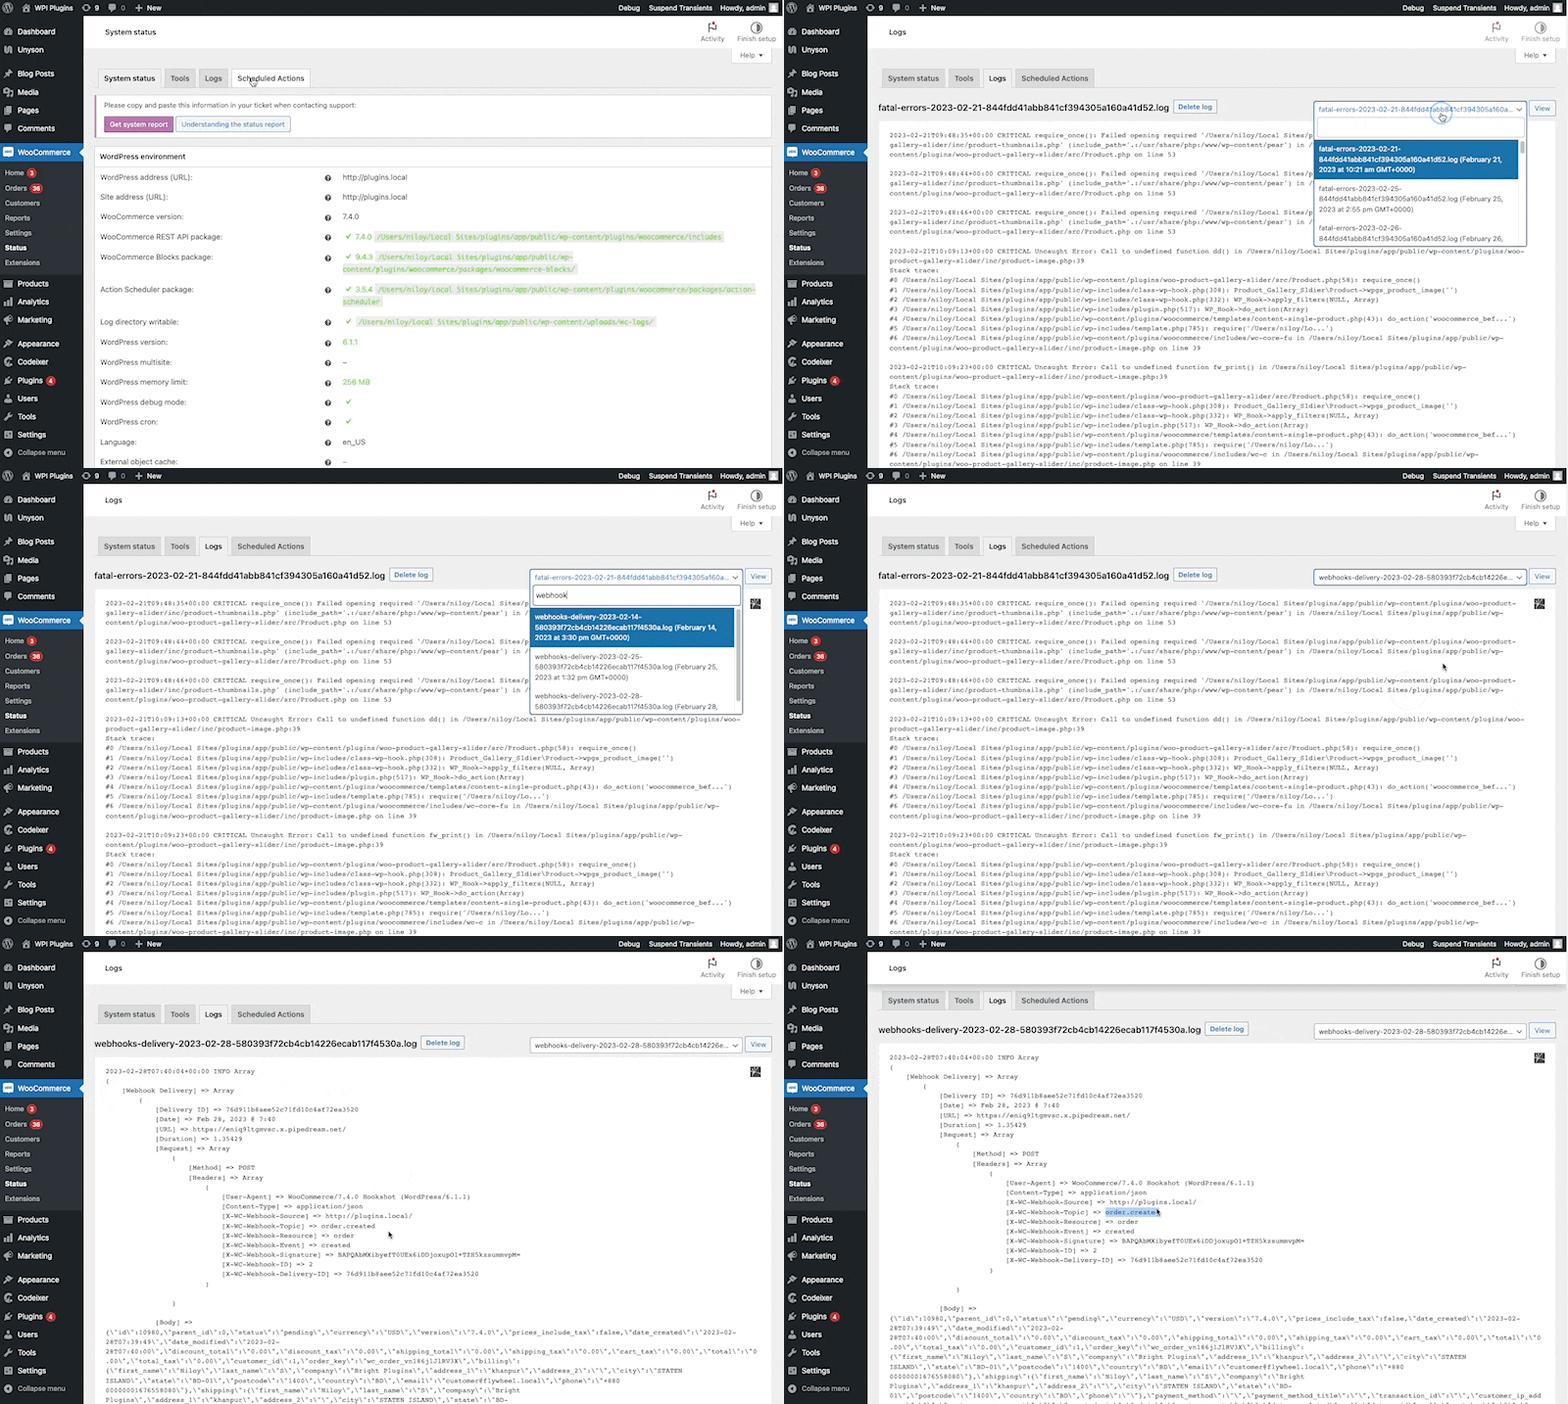
WooCommerce logs won’t display the webhook payload data if WP Debug is not set to true in your wp-config.php file.
WooCommerce Webhooks: Most Common Issues
After your webhook is functioning, you can experience issues. The following are some of the most common webhook issues and their fixes.
You Can’t Activate a Webhook
WooCommerce will test the delivery of a newly created webhook before allowing it to be activated.
WooCommerce will attempt to send some data to the delivery URL to test the connection. When a request does not return a 200 OK response code, the webhook will be listed as “Disabled.”
WooCommerce will display a message with the cause of the error so you can troubleshoot it:
- Delivery URL cannot be reached: <reason>
- Delivery URL returned response code: <code>
The following are some typical error codes and their explanations if the issue is with answer codes:
- 401 – Bad Request: It depends on the delivery URL, but if the webhook points to a third-party URL, a 401 typically means the request has invalid data.
- 403 Forbidden Access: This indicates that unauthorized access has been attempted to the specified URL.
- 404 – Not Found: The requested URL is not available.
Webhook Switches to Disabled After Each Test
Whenever a webhook reports an error, WooCommerce will automatically disable the webhook. Looking at your WooCommerce webhooks logs will help you determine the issue and why it was disabled.
Every WooCommerce webhook delivery is recorded with the request and response data, so you can determine what went wrong with the detailed information.
If you use a lot of webhooks, your log files may become quite large, so scanning for webhook IDs or delivery URLs will simplify your search to locate the logs.
The Takeaway
That’s all from today’s round-up about the WooCommerce webhooks guide. Webhooks are an excellent way to connect your WooCommerce store with other apps. Thus, you must be proficient in using Webhooks.
You can genuinely understand webhooks by creating one yourself. After your webhook is up and running, you can test it by using the free tools mentioned above. Hopefully, our comprehensive guide on WooCommerce Webhooks will be helpful to you.
If you’re feeling confused or stuck, don’t worry! Our team is here to help you figure it all out. We have extensive knowledge about WooCommerce webhooks, and we can guide you through setting them up, fixing any issues, or customizing them to meet your specific needs. Simply contact us, and we’ll be more than happy to assist you. We’re eager to help you enhance your online store with WooCommerce webhooks!


